EPFO Login Portal – PF Passbook, Member & UAN Login & Claim Status 2026
EPFO Login often feels complicated for many employees because of technical errors and confusing menus. But managing your Provident Fund shouldn’t be a struggle.
Whether you need to activate your UAN, check your current PF balance, or download your latest Member Passbook, clarity is key. You might be stuck with a “pending” claim status or simply need money urgently through the PF withdrawal process. One small mistake can lead to rejection.
That’s why we wrote this guide. We strip away the complex jargon and provide a direct, step-by-step walkthrough for every EPFO Portal service. From fixing pf login issues to ensuring your money hits your bank account safely—here is the simplest way to master your PF account today.
EPFO Portal Overview
Before we dive into the steps, here are the official details you need for quick access:
| Details | Information |
| Portal Name | EPFO Member e-Sewa Portal |
| Official Website | unifiedportal-mem.epfindia.gov.in |
| Login ID | 12-Digit UAN Number |
| Key Services | PF Balance, Passbook, Withdrawal, KYC Update |
| Mobile App | UMANG App |
| Helpline Number | 1800-118-005 / 14470 |
| Passbook Check | passbook.epfindia.gov.in |

What is EPFO Login and Why Does It Matter?
EPFO Login Portal is the official online access system of the Employees’ Provident Fund Organisation that lets employees manage their PF account digitally.
Every month, 12% of your salary goes into your PF, and your employer contributes the same amount. Through the EPFO Portal, you can check balance, download passbook, apply for withdrawal, and track claims — anytime, without visiting the office.
Why the EPFO Portal is Important for Every Member
Before the online system existed, checking your PF balance or withdrawing money meant visiting the regional EPFO office, standing in long queues, and dealing with endless paperwork.
I remember doing this in 2015 when I changed my first job — it took nearly 3 weeks just to get my claim processed physically.
Today, the EPFO member portal has changed everything. Here’s what you can do online:
| Task | Benefit |
|---|---|
| Check PF Balance | Know your savings instantly |
| Download Passbook | View complete contribution history |
| Apply for PF Withdrawal | Get money without office visits |
| Track Claim Status | Know exactly where your claim stands |
| Update KYC Details | Link Aadhaar, PAN, and bank account |
| Transfer Previous PF | Merge old accounts into current one |
The portal saves time, reduces stress, and puts you in control of your own money.
Understanding UAN: Your Key to EPFO Services
UAN (Universal Account Number) is a 12-digit unique number assigned to every PF member. Think of it as your permanent identity in the EPFO system.
Even if you change multiple jobs throughout your career, your UAN remains the same. Only your Member ID changes with each employer, but all these IDs get linked to your single UAN.
This is exactly why UAN activation is the first step before you can use any EPFO online service.
How to Activate Your UAN: Step-by-Step
If your employer has already registered you under the EPF scheme, your UAN is automatically generated. However, to access your PF account online, you must first activate this UAN and create your epfo login password. The entire process takes just 5 minutes if all your details are correct.
Before You Begin: Check These Requirements
Before starting the activation process, make sure you have these things ready:
| Requirement | Why It’s Needed |
| 12-digit UAN Number | Your unique PF identity |
| Aadhaar Card | For identity verification |
| Aadhaar-linked Mobile Number | To receive OTP for verification |
| Name matching in both records | Aadhaar name must match PF records |
| Date of Birth matching | DOB in Aadhaar must match PF records |
Important: Your Aadhaar-linked mobile number must be active and accessible during this process. Without it, you cannot receive the OTP and activation will fail.
Step-by-Step UAN Activation Process
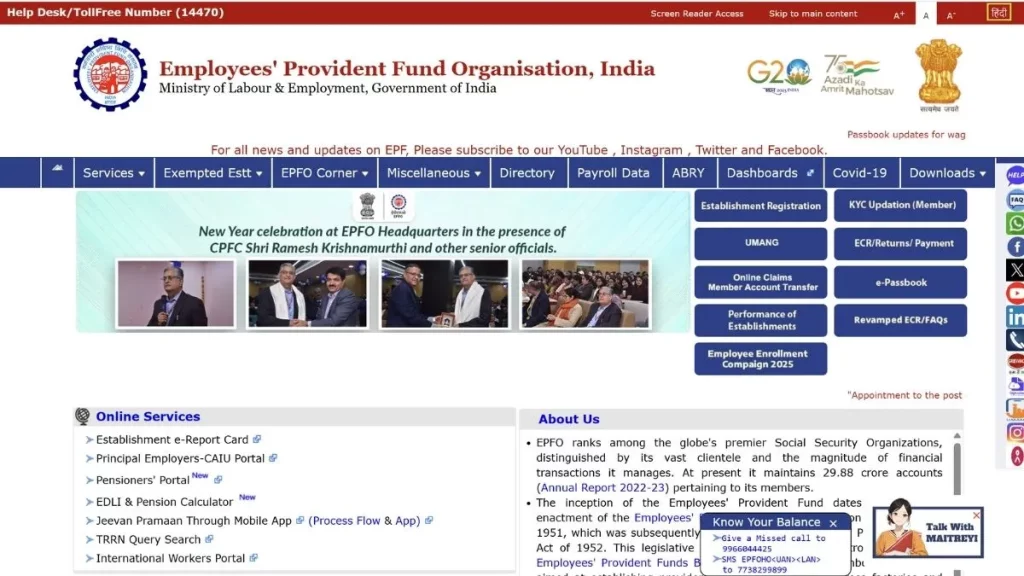
Step 1: Open EPFO Website
Open your browser and search for “EPFO Login” on Google. Click on the first official link or directly visit epfindia.gov.in. On the homepage, look at the right-hand side where you’ll see multiple options.
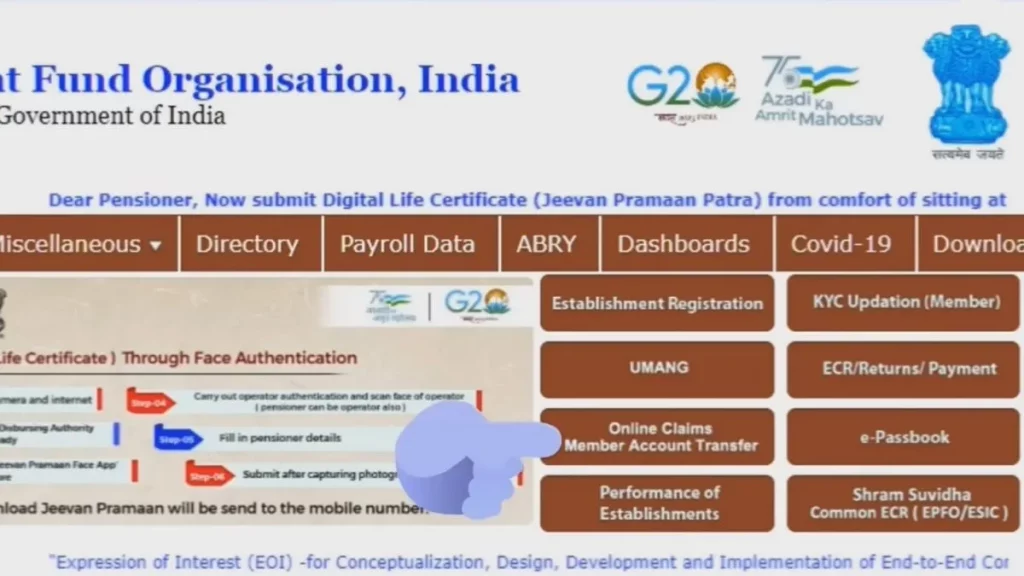
Step 2: Go to Member Portal
Click on “For Employees” section and then select “Member UAN/Online Services”. You can also click on “Online Claim/Member Account Transfer” option. This will redirect you to the Unified Member Portal where you’ll see a epfo login screen.
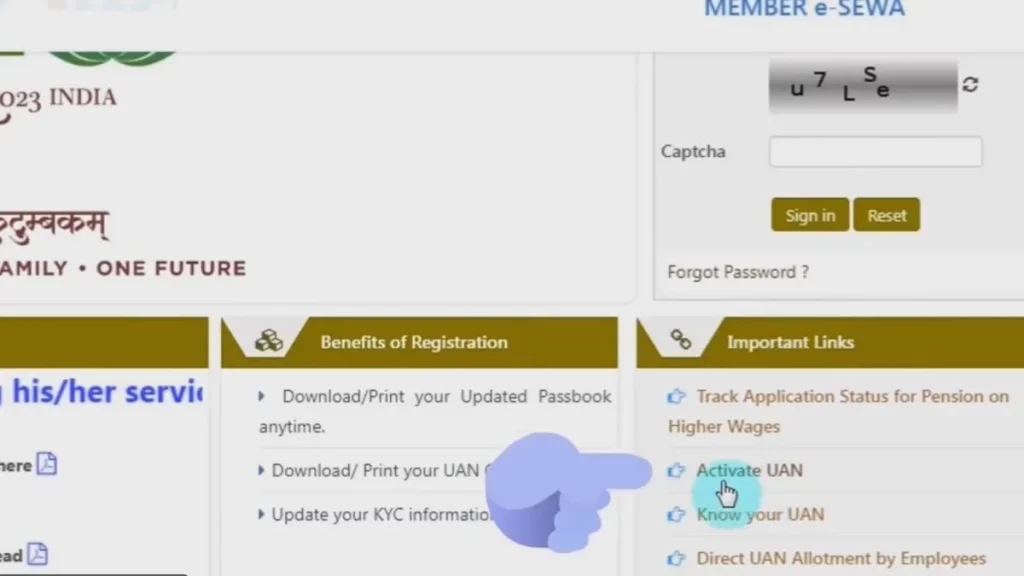
Step 3: Click on Activate UAN
On the login page, you’ll see a section called “Important Links” below the login box. Here, click on “Activate UAN” option. A new page will open with instructions and a form to fill.
Step 4: Read the Instructions Carefully
Before filling the form, the portal shows you three important conditions:
- Your UAN, Aadhaar, Name, and Date of Birth must be recorded in your PF account
- You need an active mobile number linked with your Aadhaar card
- Your PF account details must match exactly with your Aadhaar card details
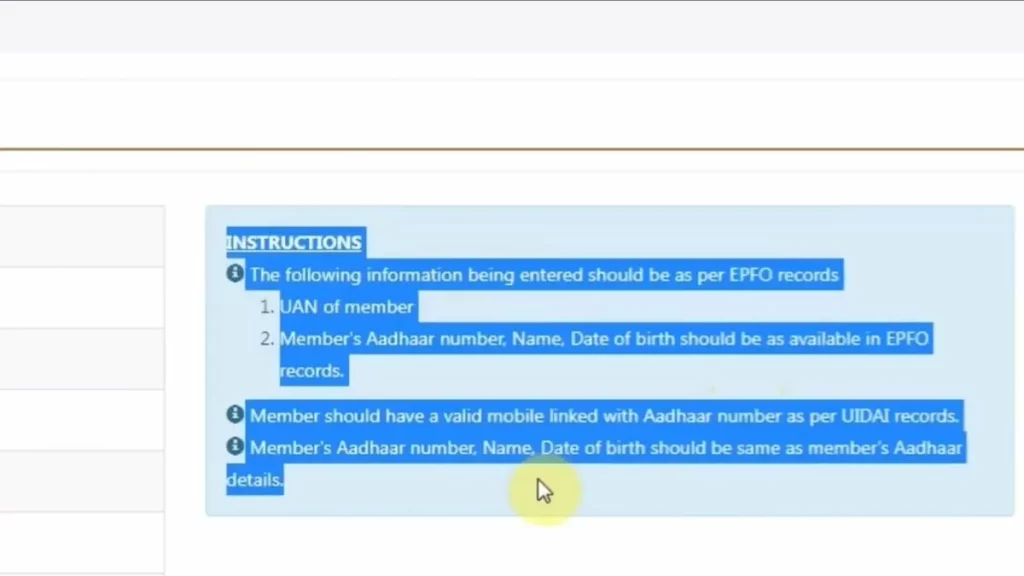
If any of these conditions are not met, your activation will fail.
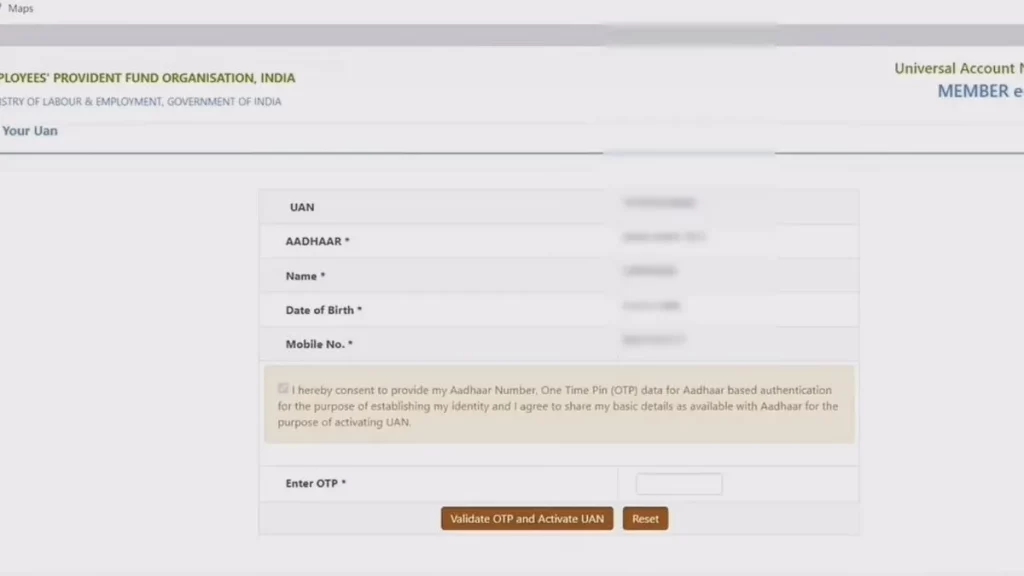
Step 5: Fill Your Details
Now fill the activation form carefully:
| Field | What to Enter |
| UAN | Your 12-digit Universal Account Number |
| Member ID / Aadhaar | Choose Aadhaar (easier option) and enter your 12-digit Aadhaar number |
| Name | Enter your name exactly as written on Aadhaar card |
| Date of Birth | Select your DOB as per Aadhaar card |
| Mobile Number | Enter mobile number linked with your Aadhaar |
| Captcha | Enter the captcha code shown in image |

Pro Tip: I recommend using Aadhaar number instead of Member ID because it’s simpler and directly verifies your identity through UIDAI database.
Step 6: Accept Disclaimer and Get OTP
After filling all details, read and accept the disclaimer checkbox. Then click on “Get Authorization PIN” button. Within a few seconds, an OTP will be sent to your Aadhaar-linked mobile number.
Step 7: Enter OTP and Activate
Enter the OTP you received in the given field. Then click on “Validate OTP and Activate UAN” button. If everything matches correctly, your UAN will be activated immediately.
Step 8: Receive Your Password via SMS
Once activation is successful, EPFO Login Portal will send a system-generated password to your Aadhaar-linked mobile number via SMS. Save this password — you’ll need it for your first login.
First Time Epfo Login and Password Change
After activation, you need to login and change your password. Here’s how:
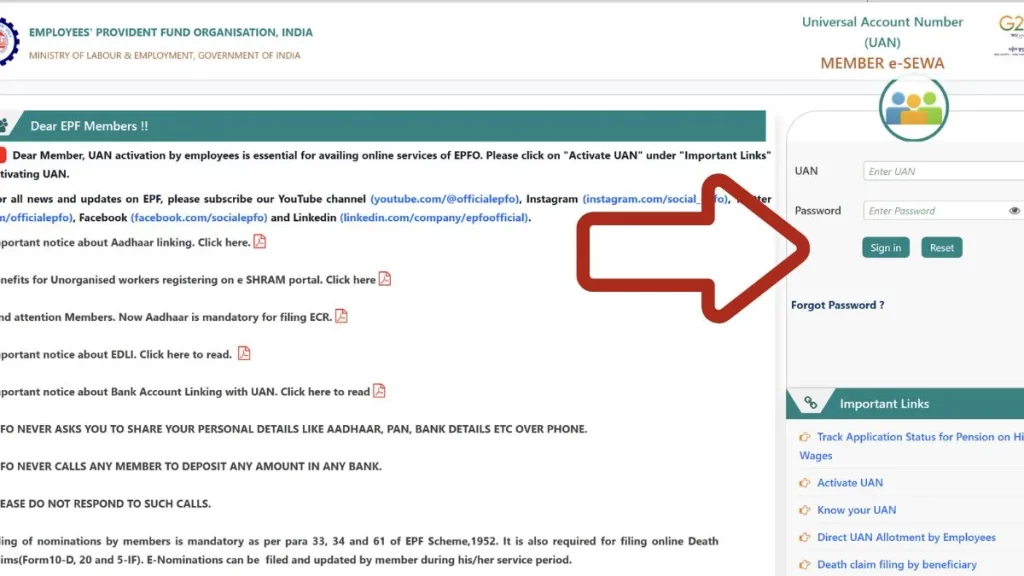
Step 1: Go to Login Page
Return to the homepage of Unified Member Portal. On the right side, you’ll see the login box.
Step 2: Enter Login Details
- Enter your UAN in the first field
- Enter the password received via SMS in the password field
- Enter the captcha code
- Click “Sign In”
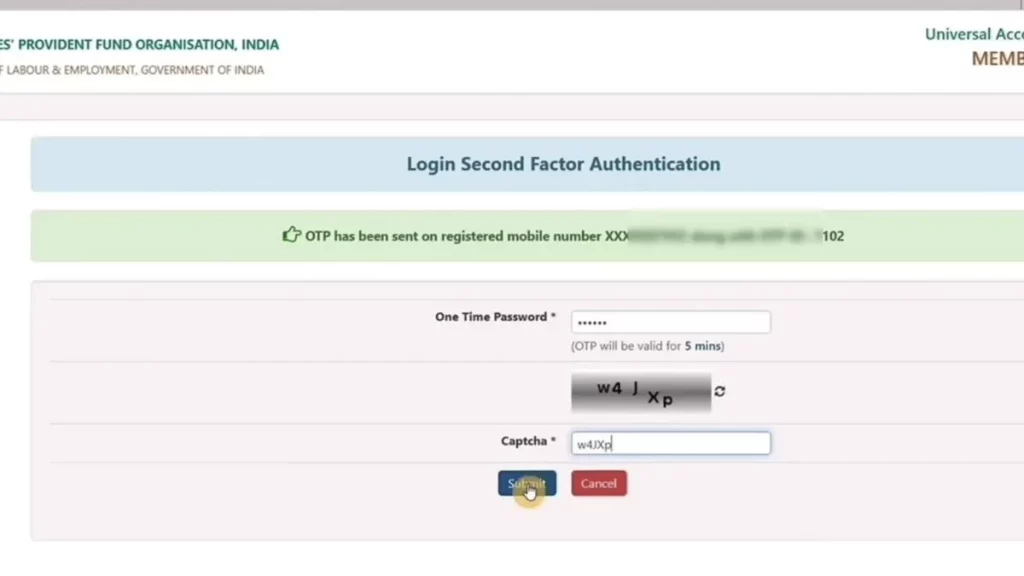
Step 3: Verify with OTP
After clicking Sign In, an OTP will be sent to your registered mobile number. Enter this OTP and captcha, then click “Submit”.
Step 4: Change Your Password (Mandatory)
On your first epfo login, the system will ask you to change your password. This is mandatory and you cannot skip it.
| Field | What to Enter |
| Old Password | The password you received via SMS |
| New Password | Create your own strong password |
| Confirm New Password | Re-enter the same new password |
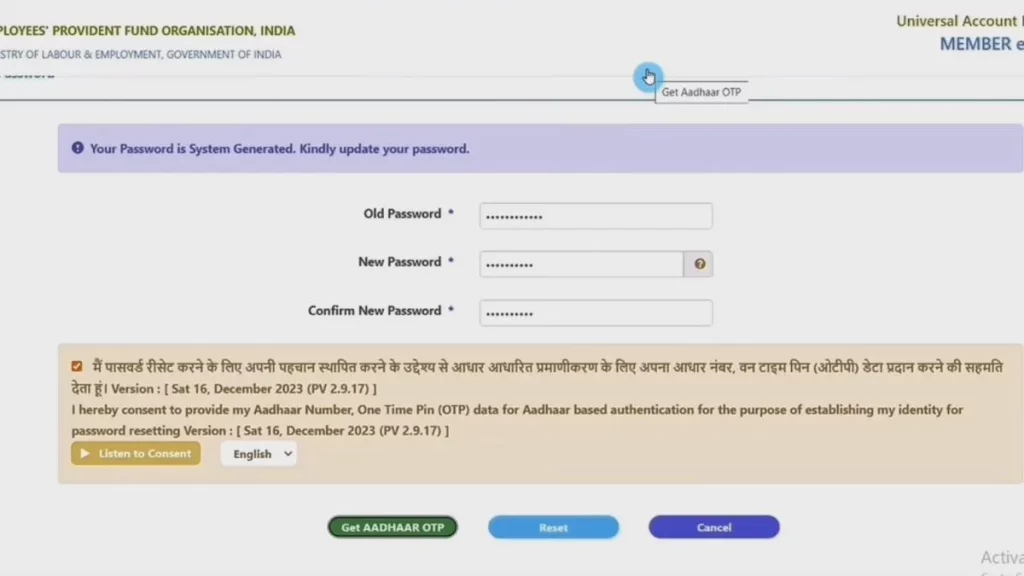
Password Requirements:
- Minimum 8 characters
- At least one uppercase letter (A-Z)
- At least one lowercase letter (a-z)
- At least one number (0-9)
- At least one special character (@, #, $, etc.)
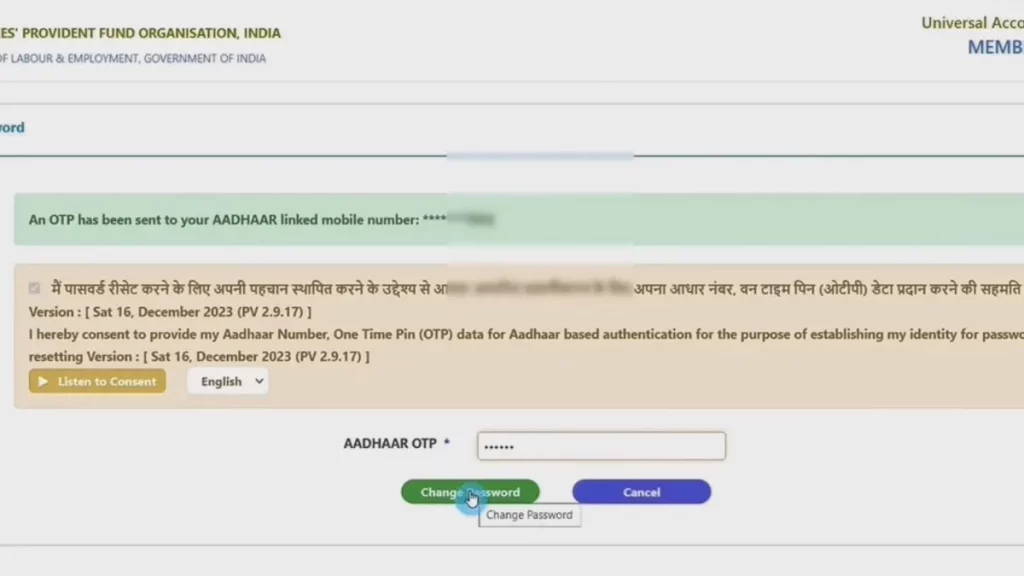
Step 5: Final OTP Verification
Accept the disclaimer and click “Get Aadhaar OTP”. Enter the OTP received on your mobile and click “Change Password”. Your password is now updated successfully.
Step 6: Epfo Login with New Password
Now go back to homepage and login again using your UAN and newly created password. Enter captcha, verify with OTP, and you’re in.
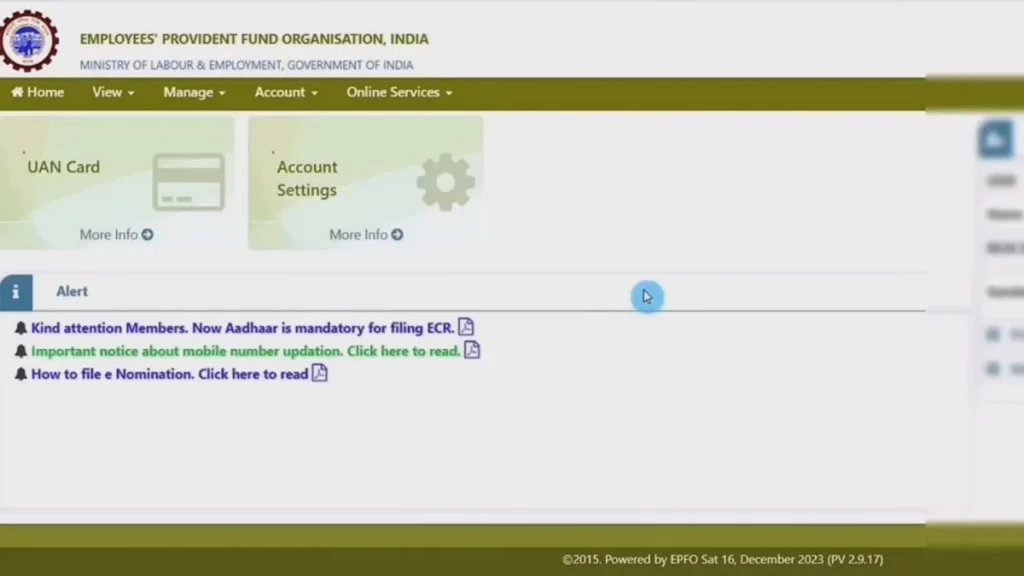
What You Can Do After Successful EPFO Login
Once logged in, your EPFO member dashboard opens up. From here you can:
- Check your PF balance
- Download and view passbook
- Update KYC details (Aadhaar, PAN, Bank)
- Apply for PF withdrawal
- Request PF transfer from old employer
- Track claim status
- Raise grievance if needed
Common UAN Activation Errors and Solutions
| Error | Reason | Solution |
| “Details do not match” | Name/DOB mismatch between Aadhaar and PF records | Contact HR to correct details in employer portal |
| OTP not received | Wrong mobile number or network issue | Check if mobile is Aadhaar-linked and active |
| “UAN already activated” | You activated before and forgot | Use “Forgot Password” option instead |
| “Invalid Aadhaar” | Aadhaar not seeded in PF account | Ask employer to link Aadhaar with your UAN |
| Captcha not loading | Browser or server issue | Refresh page or try different browser |
Pro Tip: If you don’t know your UAN, ask your employer’s HR department. They can provide it from their EPFO employer portal. Alternatively, check your salary slip — UAN is usually mentioned there.
EPFO Login Process: Step-by-Step Member Portal Guide
Once your UAN is activated and your password is set, logging into your PF account becomes very simple. Still, many members get confused because they don’t follow the exact sequence on the official website of the Employees’ Provident Fund Organisation.
Let’s go through the correct process in the same practical, step-by-step way.
Step 1: Open the Official EPFO Website
First, open any browser on your mobile or computer — Chrome, Edge, or Safari. In the search bar, type EPFO Login and press Enter.
You will see the official website of EPFO at the top of the search results. Click on the first official link. Always make sure you are opening the genuine government website to avoid phishing pages.
Step 2: Go to “For Employees” Section
After the homepage loads, you will see multiple options under the Services section.
Do not click randomly. Select “For Employees” from the list. This is important because employers and employees have separate login areas.
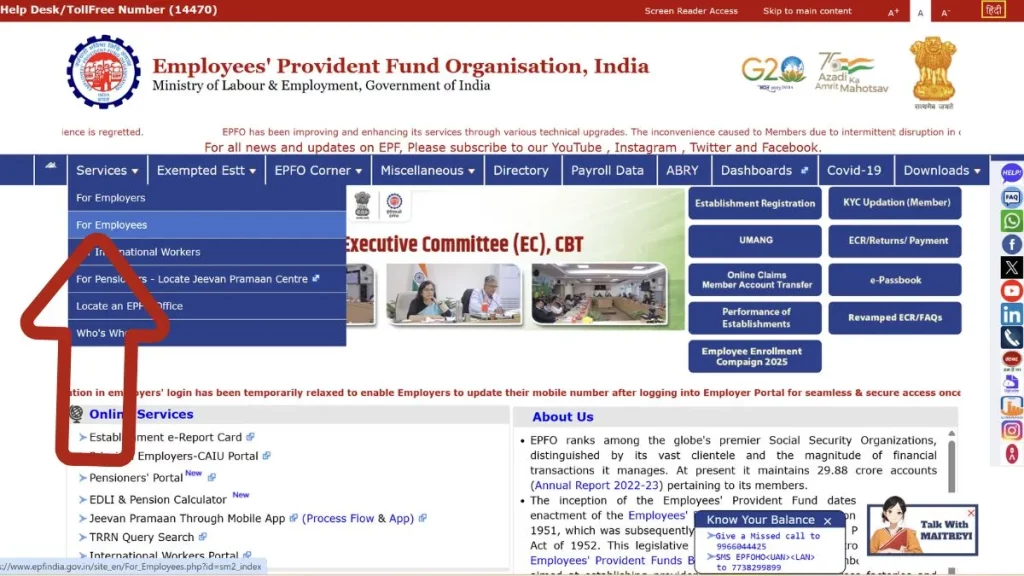
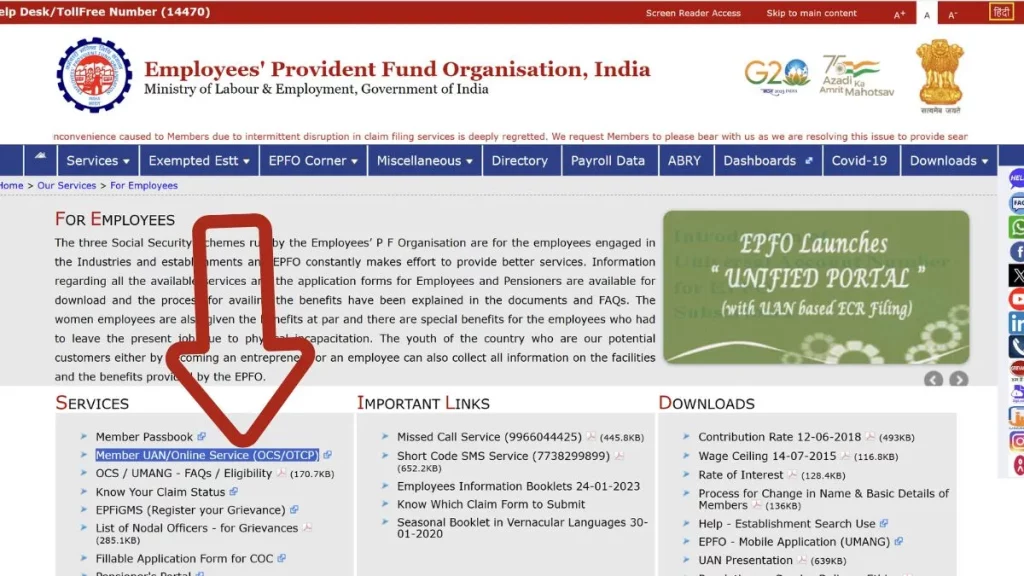
Step 3: Click on “Member UAN/Online Services”
Once you click on “For Employees,” a new page will open.
Here you will find the option called “Member UAN/Online Services.” Click on this option. This will redirect you to the Unified Member Portal login page.
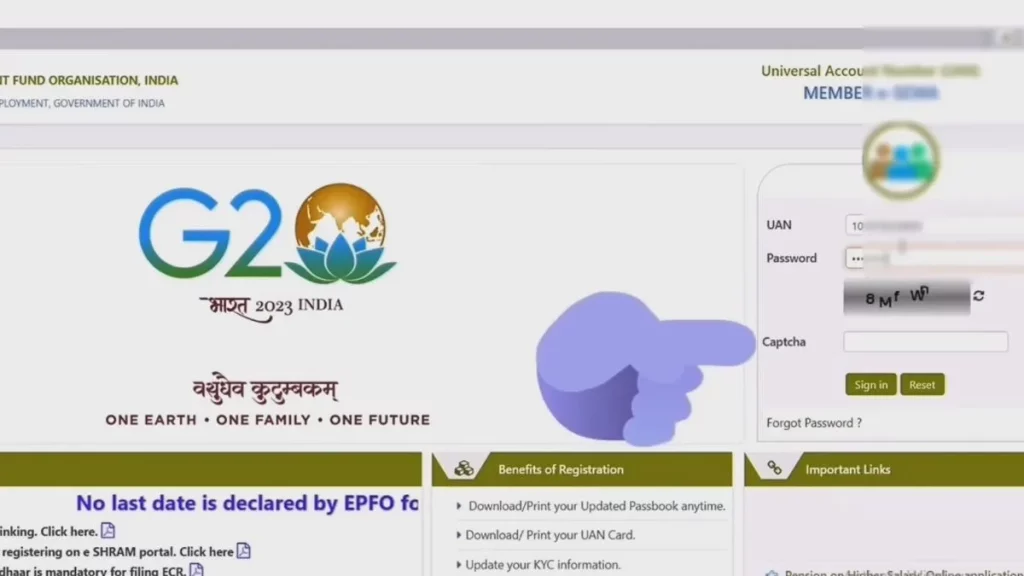
Step 4: Enter Your UAN and Password
Now you will see the EPFO login screen with three main fields:
- UAN (12-digit number)
- Password
- Captcha
Enter your UAN number carefully.
Then enter your password (the one you created after activation).
Type the captcha exactly as shown in the image.
If you have forgotten your password, use the “Forgot Password” option available below the login box.
Step 5: Click on Sign In
After entering all details correctly, click on the “Sign In” button.
If your credentials are correct, the system will move to the next verification step.
Step 6: OTP Verification
After clicking Sign In, a 6-digit OTP will be sent to your registered mobile number (the number linked with your Aadhaar and UAN).
Enter the OTP in the given field and click Submit.
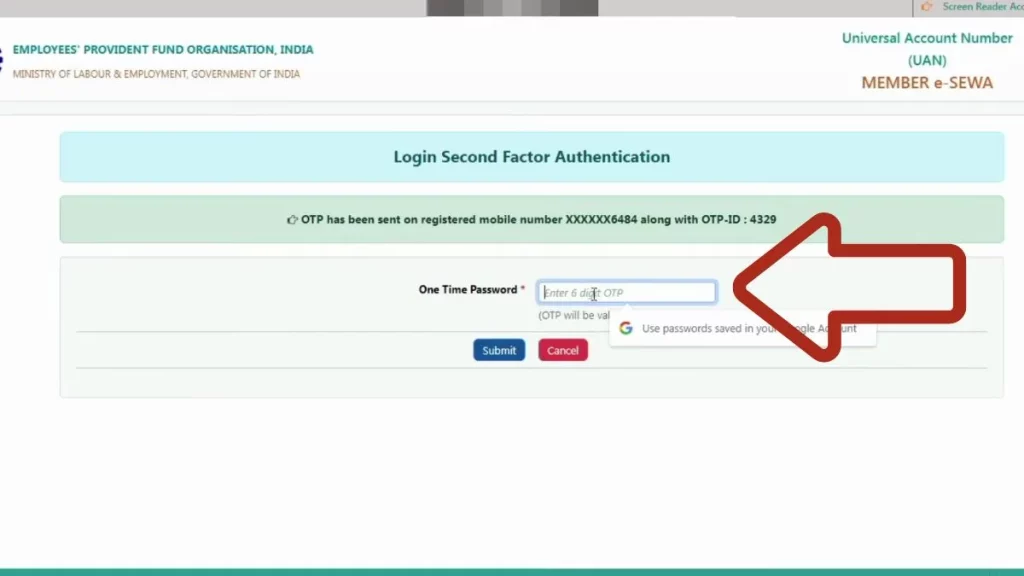
If the OTP matches successfully, the portal will load your member dashboard.
Step 7: Access Your Member Dashboard
Once logged in, you will see your EPFO member dashboard. From here, you can:
- Check PF balance
- Download passbook
- Apply for PF withdrawal
- Track claim status
- Update KYC details
- Transfer old PF account

If the page takes time to load, wait patiently — sometimes the portal slows down during peak hours.
EPFO Passbook: How to Check, Download, and Understand It
Your EPFO passbook is a detailed record of all contributions made to your PF account — both by you and your employer. It shows monthly deposits, interest credited, and current balance.
How to View and Download Your Passbook
Method 1: Through Member Portal
- Complete the EPFO login process on the member portal
- Click on “View” in the top menu
- Select “Passbook”
- Choose your Member ID (if you have multiple)
- Your passbook will open in a new tab
- Click “Download” to save as PDF
Method 2: Through UMANG App
- Open UMANG and search for EPFO
- Go to “View Passbook”
- Enter your UAN and verify with OTP
- Your passbook appears instantly
Understanding Your Passbook Entries
| Column | Meaning |
| Wage Month | The month for which contribution was made |
| ECR | Electronic Challan cum Return (employer submission) |
| EE Share | Employee’s contribution (your share) |
| ER Share | Employer’s contribution |
| Pension Contribution | Amount going to pension fund |
| Remarks | Any special notes |
Common Passbook Issues and Solutions
Issue 1: Passbook Not Updating
Sometimes, your latest contributions don’t show for 2-3 months. This usually happens because:
- Employer delayed the ECR filing
- EPFO server processing backlog
- Technical glitches during month-end
Solution: Wait for 15-20 days after month-end. If still not updated, ask your employer to verify ECR submission.
Issue 2: Passbook Shows “No Records Found”
This happens when:
- Your KYC is incomplete
- UAN is not linked to current Member ID
- Employer hasn’t mapped your UAN correctly
Solution: Complete your KYC (Aadhaar, PAN, Bank) and request your employer to verify UAN mapping.
Issue 3: Old Employer Contributions Missing
If you transferred your old PF but those records don’t show:
- The transfer may still be processing
- Old and new Member IDs might not be linked
Solution: Check transfer claim status. If approved but not reflecting, raise a grievance on EPFiGMS portal.
PF Withdrawal Process: Complete Step-by-Step Guide
Withdrawing your PF online sounds simple, but this is exactly where most members get stuck. Either the claim gets rejected, or it stays pending for weeks without any update. I’ve personally seen colleagues make small mistakes during the withdrawal process and then wait for months to get their money.
The good news? If you follow the right steps and check everything before applying, your PF amount can reach your bank account within 7-15 days. Let me walk you through the complete process — the way it actually works in 2025.
When Can You Withdraw Your Full PF Balance?
Not everyone can withdraw their complete PF amount. EPFO has specific conditions for full withdrawal:
| Situation | What You Can Withdraw |
| Unemployed for 1 month | Up to 75% of PF balance |
| Unemployed for 2+ months | 100% PF + Pension amount |
| Retirement (58 years age) | Full amount with interest |
| Job change with 2+ months gap | Full or partial withdrawal |
| Service period 1 to 113 months | Full settlement allowed |
Important Rule: If your service period is more than 1 month but less than 113 months (approximately 9.4 years), and you’ve been unemployed for more than 2 months, you can apply for complete PF final settlement — including employee contribution, employer contribution, pension amount, and interest earned till the date of claim.
Before You Apply: Mandatory Checklist
This is where most members make mistakes. They directly jump to the claim form without checking these critical requirements. If any of these are missing, your claim will be rejected automatically.
Checklist 1: KYC Must Be Complete and Verified
| KYC Document | Status Required | Why It’s Needed |
| Aadhaar | Verified ✅ | OTP verification during claim |
| PAN | Verified ✅ | Mandatory for amount above ₹50,000 |
| Bank Account with IFSC | Verified ✅ | PF money will be transferred here |
| Mobile Number | Active ✅ | To receive OTPs |
How to Check KYC Status:
- Login to EPFO member portal
- Go to “Manage” menu
- Click on “KYC”
- Check “Currently Active KYC” section
- All three (Aadhaar, PAN, Bank) should show “Verified”
If any KYC is pending, get it updated first. Without verified KYC, don’t even try applying — it will be rejected.
Checklist 2: Date of Exit Must Be Updated
This is something many members don’t know. Your Date of Exit (DOE) — meaning the date you left your last job — must be updated in your PF account.
Without DOE, the system doesn’t know that you’ve left the company, and your withdrawal claim cannot be processed.
How to Check Date of Exit:
- Login to member portal
- Go to “View” → “Service History”
- Check if your last employment shows “Date of Exit”
- If blank, contact your previous employer’s HR to update it
Checklist 3: Transfer Old PF Accounts First (If Applicable)
If you’ve worked in multiple companies and have separate PF accounts with different Member IDs, you must transfer all old PF balances to your current account before applying for final settlement.
Why This Matters:
- If you apply for final settlement without transferring old accounts, your old PF money can get stuck
- EPFO may reject your claim asking for consolidation first
- You might lose track of old accounts permanently
Pro Tip: Complete PF transfer first, wait for it to reflect in your passbook, then apply for withdrawal.
Two Forms You Need to Submit
To withdraw your complete PF balance, you need to submit two separate claim forms:
| Form | Purpose | What It Withdraws |
| Form 19 | PF Final Settlement | Employee contribution + Employer contribution + Interest |
| Form 10C | Pension Withdrawal | EPS (Pension) contribution |
Both forms are submitted online through the same portal, but you apply for them one after another — not together.
Step-by-Step PF Withdrawal Process
Now let’s go through the actual withdrawal process. Follow each step carefully.
Step 1: Login to EPFO Member Portal
Open unifiedportal-mem.epfindia.gov.in and login with your UAN and password. Complete OTP verification to access your dashboard.
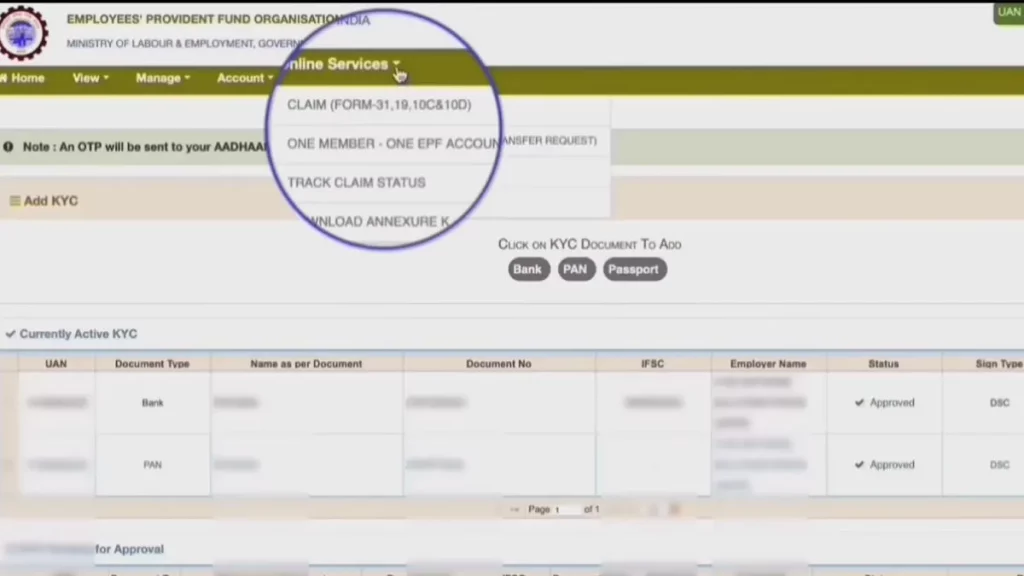
Step 2: Navigate to Claim Section
Go to “Online Services” in the top menu and click on “Claim (Form-31, 19, 10C & 10D)”. A new page will open.
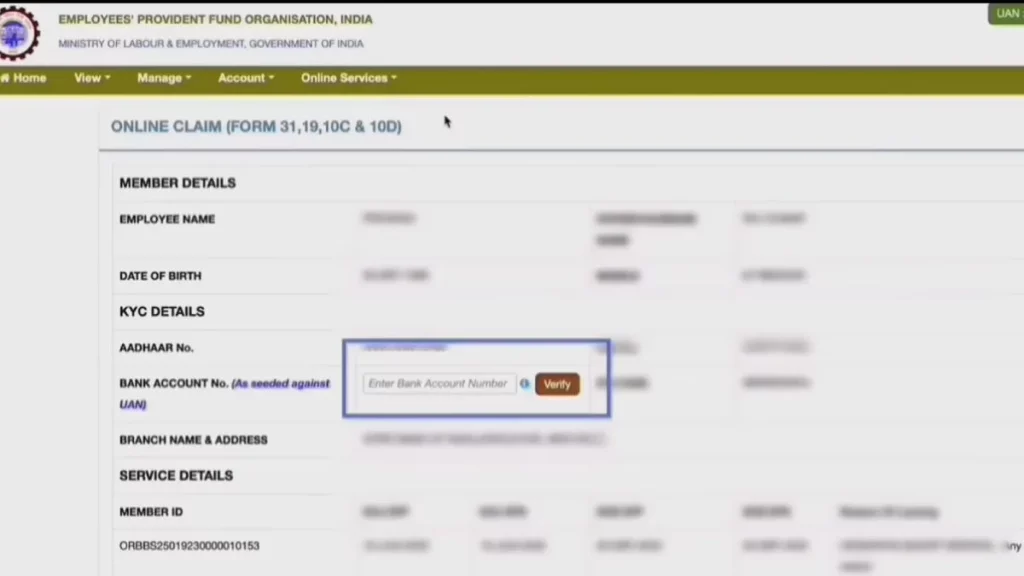
Step 3: Verify Your Bank Account
Enter the last 4 digits of your bank account number that is linked with your PF account. Click “Verify” and confirm. This is the account where your PF money will be credited.
Step 4: Proceed to Online Claim
After bank verification, click on “Proceed for Online Claim” button. The claim form page will open.
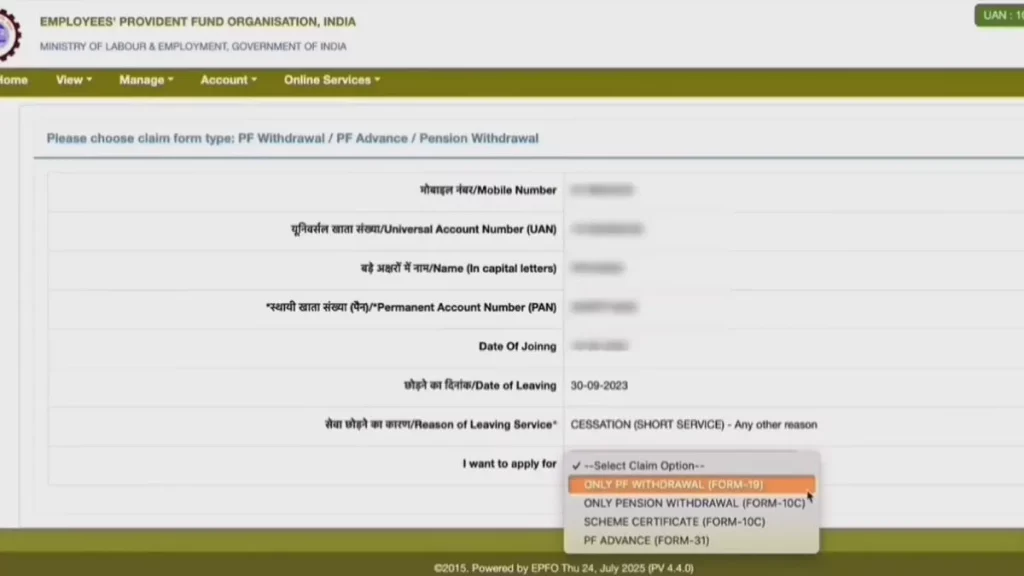
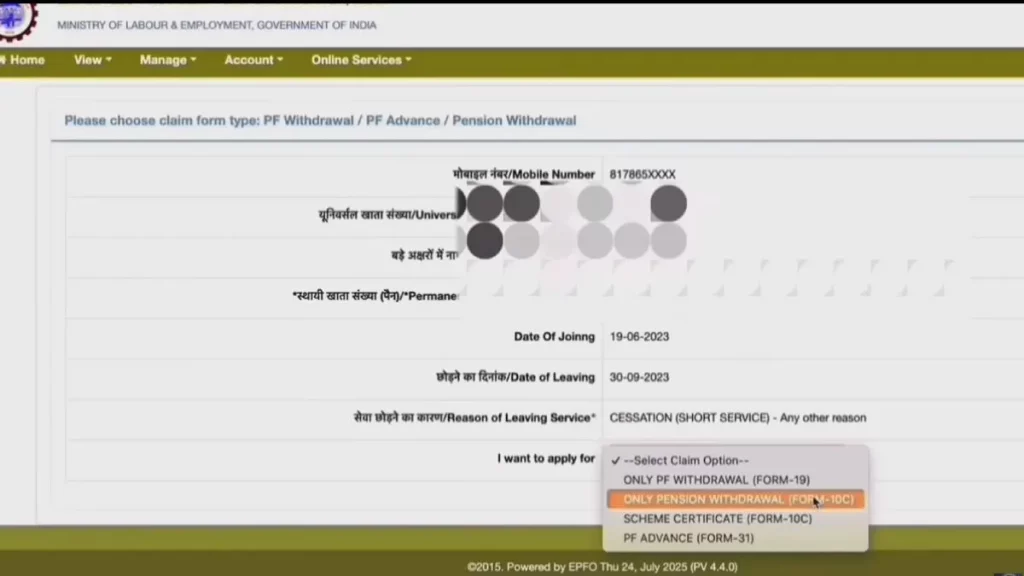
Step 5: Select Form 19 (PF Withdrawal)
In the dropdown “I Want to Apply For”, select “Only PF Withdrawal (Form 19)”. Additional fields will appear below.
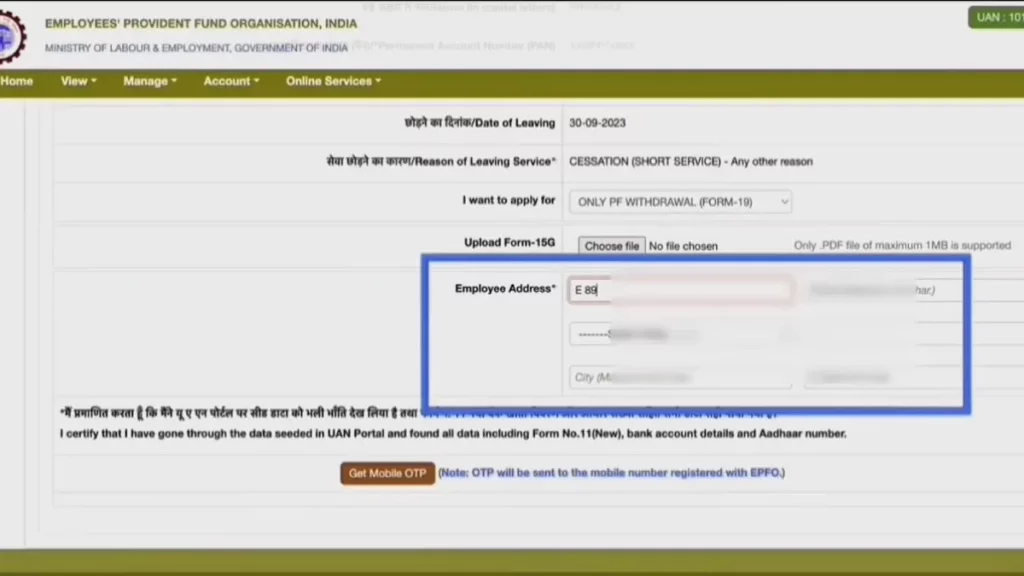
Step 6: Upload Form 15G (If Applicable)
You’ll see an option to upload Form 15G. This form is needed only if:
| Condition | Form 15G Required? |
| PF amount above ₹50,000 + Service less than 5 years | Yes (to avoid TDS) |
| PF amount below ₹50,000 | No |
| Service period 5+ years | No |
| You’re okay with TDS deduction | No |

Form 15G is a declaration to avoid TDS (Tax Deducted at Source) on your PF withdrawal. If your conditions don’t match, leave this field blank.
Step 7: Enter Your Complete Address
Fill in your complete address exactly as it appears on your Aadhaar card. Any mismatch can cause verification failure.
Address fields include:
- House/Building Number
- Street/Locality
- City/Town
- State
- PIN Code
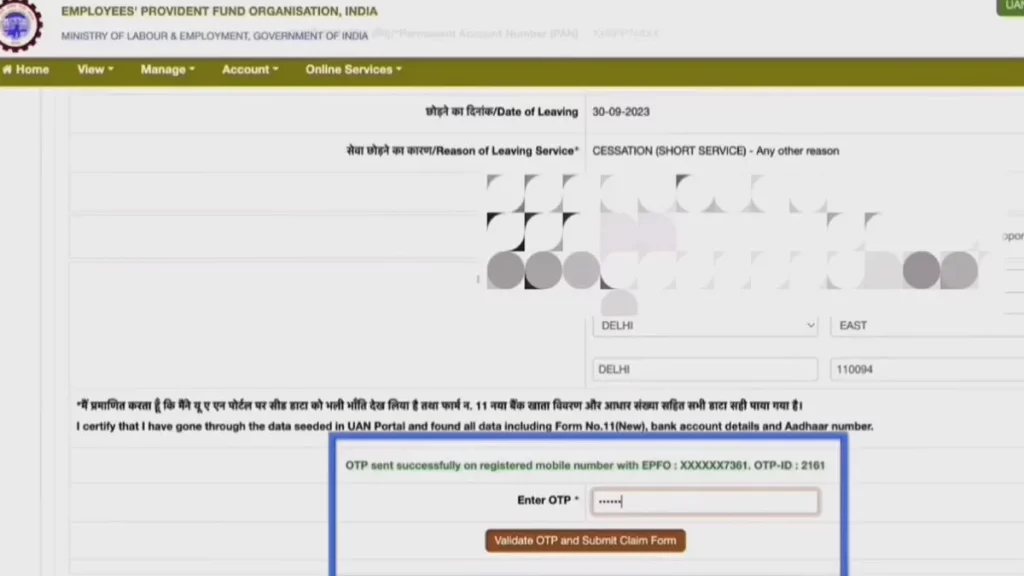
Step 8: Get Aadhaar OTP
Click on “Get Mobile OTP” button. An OTP will be sent to your Aadhaar-linked mobile number.
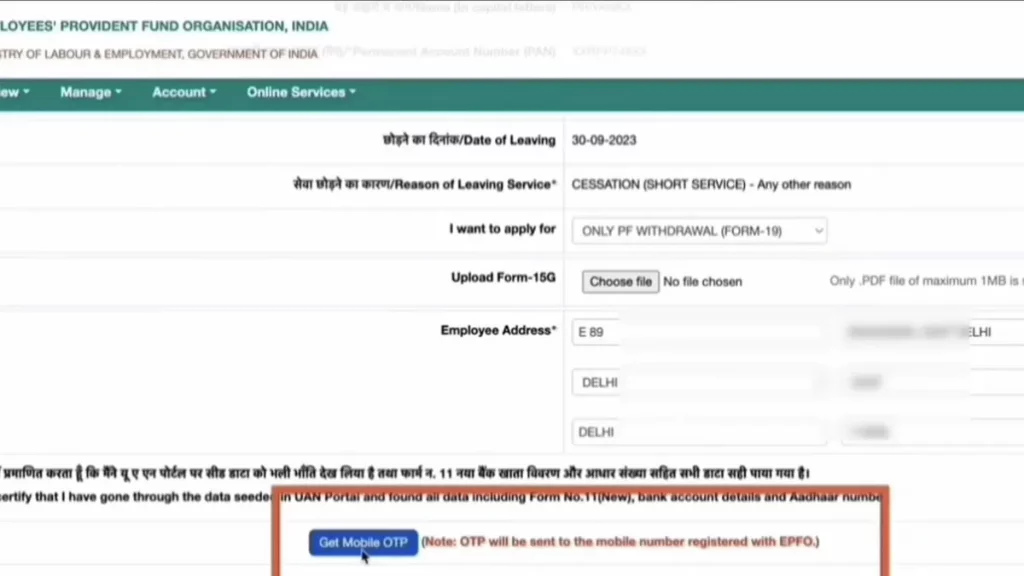
Important: Make sure your Aadhaar has an active mobile number linked. Without this, you cannot complete the claim submission.
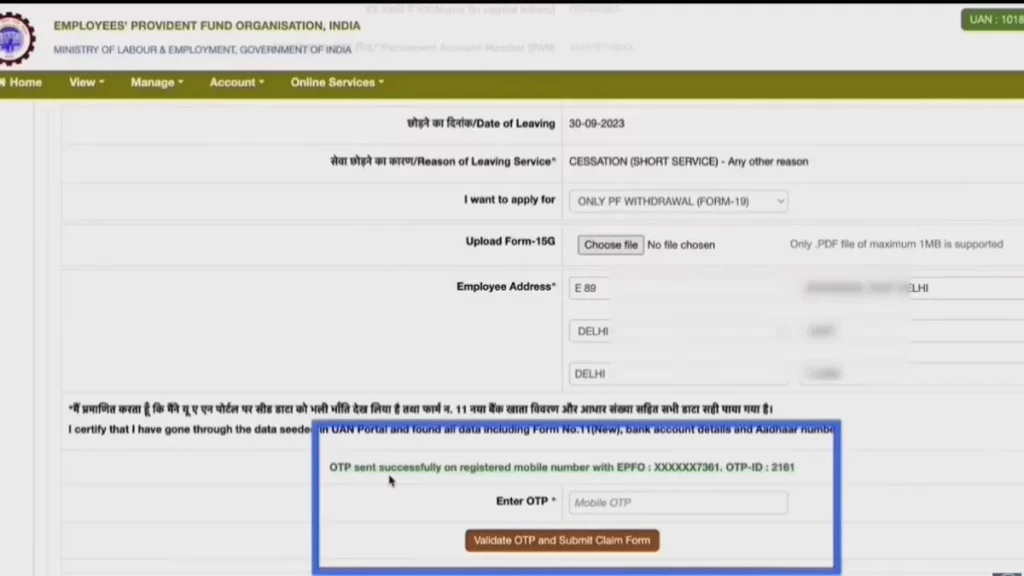
Step 9: Submit Form 19
Enter the OTP and click on “Validate OTP and Submit Online Claim”. Your Form 19 (PF Withdrawal) is now submitted successfully.
Step 10: Now Submit Form 10C (Pension Withdrawal)
Go back to “Online Services” → “Claim” again. Verify your bank account again and proceed.
This time, in “I Want to Apply For”, select “Only Pension Withdrawal (Form 10C)”.
Step 11: Complete Form 10C Submission
Enter your address as per Aadhaar, get OTP, and click “Validate OTP and Submit Online Claim”.
Your pension withdrawal claim is now submitted.
What Happens After Submission?
Once both forms are submitted, here’s the typical timeline:
| Stage | Timeline | What Happens |
| Claim Received | Day 1 | EPFO acknowledges your application |
| Under Process | Day 2-5 | Field office reviews your claim |
| Employer Verification | Day 5-10 | If needed, sent to employer for approval |
| Claim Settled | Day 7-15 | Approved and processed |
| Bank Credit | Day 15-18 | Money transferred to your bank (2-3 days after settlement) |
Normal Processing Time: 7-15 working days for claim settlement, plus 2-3 working days for bank transfer.
PF Withdrawal Processing Time Summary
| Claim Type | Expected Time |
| Form 19 (Full PF Settlement) | 10-20 days |
| Form 10C (Pension Withdrawal) | 10-20 days |
| Form 31 (Partial Advance) | 7-15 days |
In my experience, claims with complete KYC and correct details get processed within 10 days. Delays usually happen due to:
- Employer verification pending
- KYC mismatch
- Date of Exit not updated
- Old PF accounts not transferred
What If Your Claim Takes More Than 20 Days?
If your claim is not settled within 20 working days, don’t just wait. Take action:
- Check Claim Status on the portal first (I’ll explain this in the next section)
- File a Grievance on EPFO Grievance Portal (epfigms.gov.in)
- Call EPFO Helpline: 1800-118-005 (toll-free)
- Visit Regional EPFO Office with your documents if online grievance doesn’t help
Filing an online grievance usually speeds up the process. EPFO officers are required to respond within a specific timeframe once a grievance is registered.
Claim Status Tracking: Know Where Your Money Is
After submitting a withdrawal request, waiting without updates can be frustrating. Here’s how to track your claim.
How to Check PF Claim Status
Method 1: Through Member Portal
- Complete the EPFO login on the portal
- Go to “Online Services” → “Track Claim Status“
- Your claim status appears with dates and remarks
Method 2: Through UMANG App
- Open UMANG → EPFO → Employee Centric Services
- Select “Track Claim Status”
- Enter UAN and verify with OTP
- View detailed status
Understanding Claim Status Messages
| Status | What It Means |
| Under Process | Claim received, being reviewed |
| Sent to Employer | Employer verification pending |
| Settled | Amount processed, check bank |
| Rejected | Some issue found, check remarks |
| Return | Sent back for correction |
Real Waiting Timelines (Based on Experience)
Let me share what actually happens:
- Day 1-3: Status shows “Under Process”
- Day 4-7: Moves to “Sent to Field Office” or employer verification
- Day 7-15: Field office processes and approves
- Day 15-20: Amount credited to bank
If your claim is stuck beyond 20 days, you should:
- Check if employer approval is pending
- Verify your KYC details are correct
- Raise a grievance on EPFiGMS portal
Frequently Asked Questions (FAQs)
-
How Can I Check My Pf Balance Without EPFO Login?
Give A Missed Call To 011-22901406 From Your Registered Mobile. You’ll Receive An Sms With Your Balance. Alternatively, Send Sms “Epfoho Uan Eng” To 7738299899.
-
Why Is My Epfo Passbook Not Showing Recent Contributions?
Employer Contributions May Take 15-20 Days To Reflect After Month-End. If It’s Been Longer, Ask Your Employer To Verify Their Ecr Submission. Passbook Updates Happen Only After Epfo Processes The Employer’s Challan.
-
Can I Withdraw Pf While Still Employed?
Yes, You Can Make Partial Withdrawals (Form 31) For Specific Purposes Like Medical Emergencies, Home Loan, Marriage, Or Education. However, Full Withdrawal Is Only Possible After Leaving The Job.
-
How Long Does Pf Withdrawal Take?
With Complete Kyc And Aadhaar Verification, Online Claims Typically Process Within 10-15 Days. Complex Cases Or Those Requiring Employer Verification May Take Up To 20 Days.
-
What Should I Do If My Pf Claim Is Rejected?
Check The Rejection Reason In Your Claim Status. Common Reasons Include Kyc Mismatch, Bank Account Errors, Or Missing Employer Approval. Correct The Issue And Reapply. If You Believe Rejection Is Wrong, Raise A Grievance On Epfigms.
-
How Do I Link My Aadhaar With Uan?
EPFO Login To The Member Portal → Go To “Manage” → Select “Kyc” → Enter Your Aadhaar Number → Submit. Verification Happens Automatically Through Uidai Database Within 24-48 Hours.
-
Can I Have Multiple Uan Numbers?
No, Each Member Should Have Only One Uan. If You Have Multiple Uans From Different Employers, You Need To Merge Them By Contacting Epfo Or Raising A Request Through The Portal.
-
Why Does The Epfo Website Work Slowly?
The Portal Experiences Heavy Traffic, Especially During Month-End When Many Members Check Passbooks. Try Accessing During Early Morning Hours (6-9 Am) Or Late Night For Better Speed.
-
How Do I Transfer My Old Pf To Current Employer?
Epfo Login Portal → Go To “Online Services” → Select “One Member One Epf Account (Transfer Request)” → Select Your Old Member Id → Submit Request. Both Old And New Employers Need To Approve The Transfer.